Thai-Style Chicken Fingers: How to Make This Delicious Recipe
Thai-Style Chicken Fingers bring together the crispy comfort of a childhood classic with the bold, aromatic flavors of Thailand. Imagine tender strips of chicken breast, coated in a crunchy almond and breadcrumb crust, baked to golden perfection, and finished with a sweet, tangy, and slightly spicy sauce that bursts with authentic Thai flair. This recipe is not just a snack; it’s a full culinary experience that satisfies both comfort food cravings and adventurous taste buds. At Just Thai Recipes, we believe food should tell a story, and this dish has one worth savoring.
Before we jump into the steps, let’s talk about the heart behind this recipe. Lina, the creator of Just Thai Recipes, started her journey with a simple goal: to bring the bold, beautiful flavors of Thailand into everyday kitchens around the world. Together with her partner, she built this platform as a place where anyone from first-time cooks to seasoned home chefs—can find inspiration to create dishes that are both authentic and approachable.
Whether it’s a street food favorite, a cozy curry, or a vibrant salad, every recipe is designed to ignite your taste buds and bring joy to your table. That mission shines through in this Thai-Style Chicken Fingers recipe, which merges tradition with creativity, making it perfect for family dinners, game nights, or a show-stopping party platter.
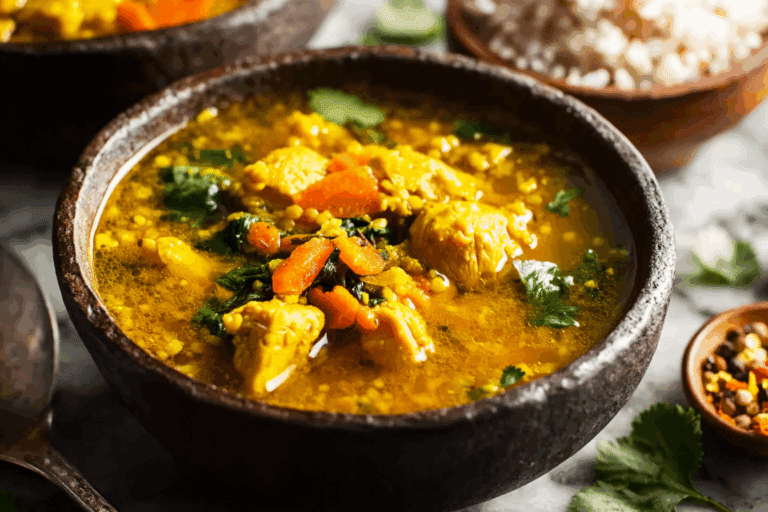
In this article, we’ll walk through everything you need to know to master this dish—from choosing the best chicken and creating the perfect breading, to crafting the sweet chili glaze and presenting it like a pro. You’ll also discover pro tips, nutritional insights, and creative serving ideas. Plus, we’ll answer some common questions about making the best Thai-style chicken at home. And if you’re craving more authentic Thai flavors, you can always discover great ideas like this turmeric chicken soup, explore unique sauces, or check out Lina’s other chicken specialties for inspiration.
Table of Contents
Table of Contents
Choosing and Preparing the Chicken for Thai-Style Chicken Fingers
Selecting the Right Cut of Chicken
For the juiciest and most flavorful Thai-Style Chicken Fingers, boneless, skinless chicken breasts are your best bet. They’re lean, cook evenly, and offer the perfect canvas for absorbing Thai-inspired flavors. Opt for fresh chicken when possible—look for firm, pink flesh with no off odors. If fresh isn’t available, frozen chicken works too; just make sure it’s fully thawed before prepping. This ensures even coating and cooking. For extra tenderness, consider marinating the chicken in a light brine of water, salt, and a pinch of sugar for 30 minutes before breading. This technique helps lock in moisture and enhances flavor.
Prepping the Chicken Strips
Start by cutting the chicken breasts into strips about 1 inch thick and 4–5 inches long. Uniform sizing is key to ensuring all pieces cook at the same rate, preventing some from drying out while others are undercooked. Use a sharp chef’s knife and a steady cutting board to keep your cuts clean and consistent. After slicing, pat the chicken dry with paper towels. This step is crucial—moisture can prevent the breading from sticking properly and can cause steaming instead of crisping during baking.
Seasoning for Flavor
Before coating the chicken, it’s important to season it well. A simple mix of salt and pepper works perfectly to highlight the natural taste of the meat without overpowering the Thai-inspired crust and sauce you’ll be adding later. Seasoning at this stage ensures flavor penetrates the chicken itself, not just the coating. If you want to build even deeper Thai-style notes, you can rub the strips lightly with ground ginger, garlic powder, or a splash of lime juice for a zesty foundation.
Pro Tip from Just Thai Recipes
Lina recommends working with small batches when coating the chicken to keep things tidy and effective. Overcrowding your breading station can cause crumbs to clump and lose their crisp texture. Plus, working in batches means you can give each strip the attention it deserves—pressing the coating in so it adheres well. For more inspiration on prepping Thai chicken dishes, check out this Bang Bang Style Thai Chicken recipe, which uses similar breading techniques but with a different flavor twist.
Creating the Perfect Thai-Inspired Coating
Building Layers of Crunch and Flavor
The coating is where Thai-Style Chicken Fingers truly shine. Instead of using only breadcrumbs, this recipe blends finely ground Rice Chex (or gluten-free bread crumbs) with sliced almonds for a nutty crunch that complements the sweet and spicy glaze. Start by adding ½ cup of almonds to a food processor, pulsing until they’re mostly fine crumbs. Then, process Rice Chex until they resemble coarse sand and mix them with the almond crumbs. This mixture creates a delicate yet satisfying crunch that won’t overpower the chicken’s tenderness. If you’re not gluten-free, traditional panko breadcrumbs can be swapped in for a slightly airier texture.
The Role of Seasoning in the Coating
Seasoning the coating is just as important as seasoning the chicken itself. A pinch of salt and pepper keeps the flavors balanced, while you can experiment with adding subtle Thai spices like a dash of ground coriander or lemongrass powder for aromatic depth. This way, every bite has a distinct Thai character even before the sauce is applied.
Mastering the Coating Process
The breading process follows a simple three-step method: dredge, dip, and coat. First, dredge the chicken strips in seasoned flour to help the egg mixture cling. Then, dip them into a whisked egg and milk mixture for moisture and adhesion. Finally, roll each strip in the almond-breadcrumb blend, pressing firmly to ensure the coating sticks. Don’t skip the 20–30 minute refrigeration step after coating—this helps the crust stay intact during baking.
Inspiration from Other Thai Chicken Favorites
If you love experimenting with breaded Thai chicken variations, there’s plenty of inspiration out there. For instance, the Thai Sticky Chicken Fingers from Iowa Girl Eats take a saucier approach with a rich glaze, while Spicy Thai Chicken Tenders from Domestic Superhero bring the heat with extra chili in the breading and sauce. If you want to try authentic deep-fried techniques, the Thai Fried Chicken recipe from Hungry in Thailand offers a street-food style crunch, and for a meal-kit style twist, the Sticky Thai Chicken Tenders from Ucook make it easy to recreate at home with pre-portioned ingredients.
Print
Thai-Style Chicken Fingers
- Prep Time: 30 minutes
- Cook Time: 25 minutes
- Total Time: 55 minutes
- Yield: 6 servings 1x
- Category: Main Course
- Method: Baking
- Cuisine: Thai
- Diet: Gluten Free
Description
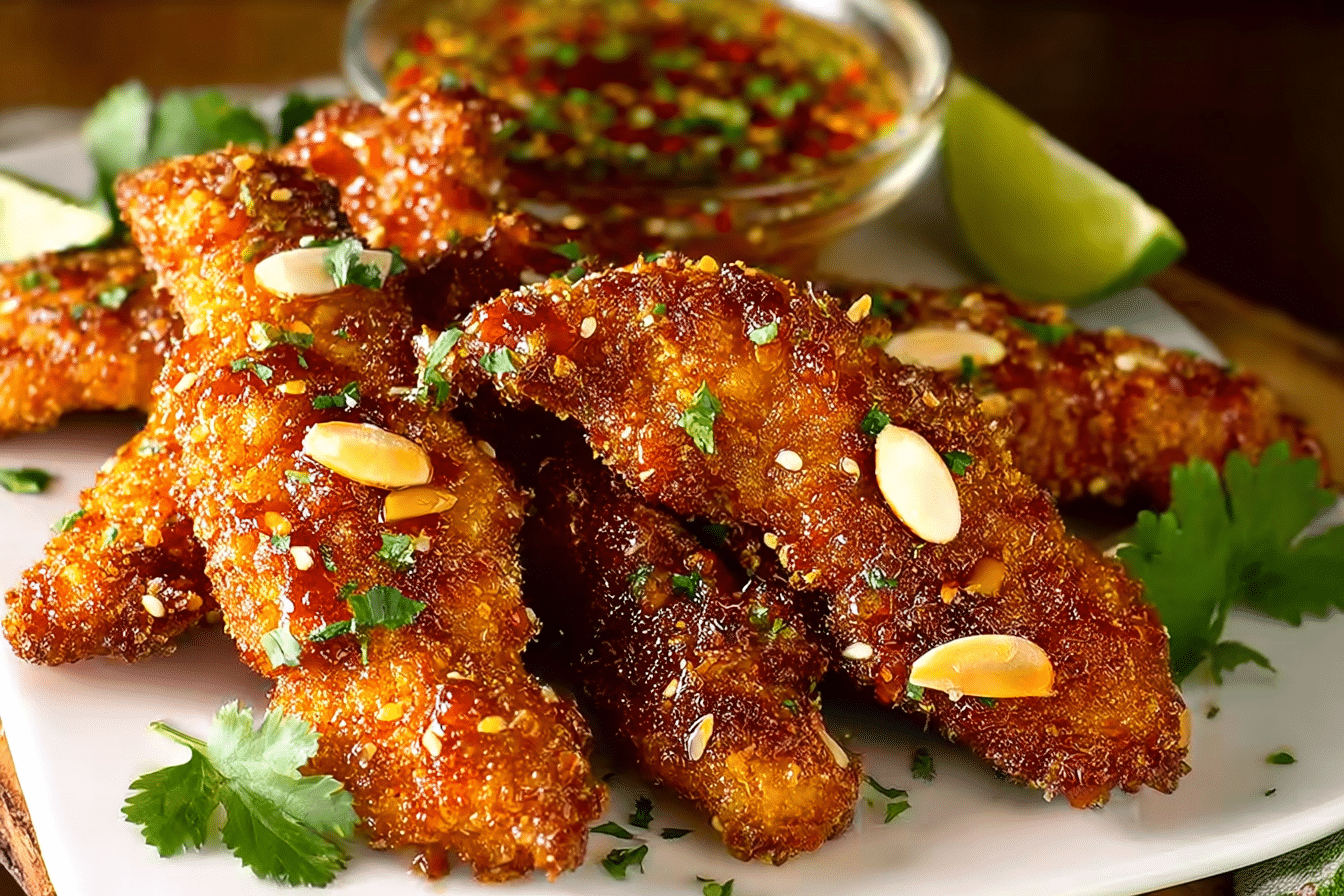
These Thai-Style Chicken Fingers are coated in a crunchy almond and gluten-free breadcrumb crust, baked until golden, then tossed in a sweet chili sauce for a flavorful twist on a classic favorite.
Ingredients
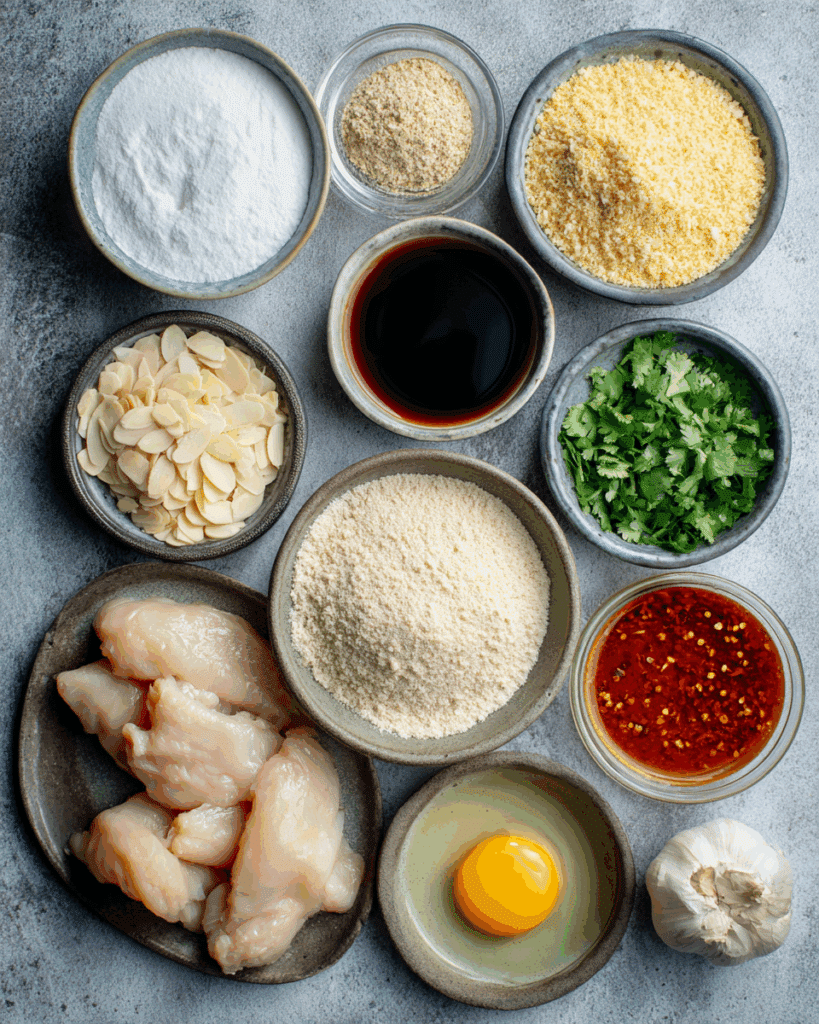
- 1–3/4 lbs chicken breasts, cut into 1” thick strips
- 1/2 cup gluten free flour, or all-purpose flour if not GF
- Salt and pepper, to taste
- 2 eggs
- 2 Tablespoons milk, any kind
- 4 cups gluten-free Rice Chex pulverized into 2 cups crumbs OR 2 cups gluten free bread crumbs
- 3/4 cup sliced almonds, divided
- 1/4 cup cilantro, chopped
- 1/2 cup sweet chili sauce
- 1/2 cup water
- 1/4 cup brown sugar
- 1/4 cup gluten free reduced-sodium Tamari, or soy sauce if not GF
- 2 Tablespoons rice vinegar
- 2 Tablespoons fresh lime juice
- 1/2 teaspoon ground ginger
- 1 clove garlic, pressed or minced
- 1/4 teaspoon red chili pepper flakes, or more or less to taste
Instructions
- Line 2 half sheet pans with parchment paper or foil, spray well with nonstick spray, and set aside.
- Whisk eggs and milk in a shallow dish. Add 1/2 cup almond slices to a food processor, process until mostly fine crumbs, and pour into another shallow dish.
- Add Rice Chex to the food processor, process until fine crumbs, and add to almond crumbs (omit step if using store-bought bread crumbs). Season almond and bread crumb mixture with salt and pepper.
- In a large Ziplock bag, combine flour, 3/4 teaspoon salt, and 1/2 teaspoon pepper. Toss chicken strips in the bag until well coated.
- In batches, shake off excess flour from chicken, dip into the egg mixture, then roll in almond-bread crumb mixture, pressing to adhere. Place coated chicken onto prepared baking sheets.
- Refrigerate for 20-30 minutes to allow the breading to adhere.
- Preheat oven to 425°F. Spray tops of chicken with olive oil or nonstick spray and bake for 10 minutes. Flip, spray again, then bake for another 7-9 minutes until golden and cooked through.
- While chicken bakes, combine sweet chili sauce, water, brown sugar, Tamari, rice vinegar, lime juice, ginger, garlic, and red chili pepper flakes in a small saucepan. Bring to a simmer over medium-high heat, then reduce to medium and cook until slightly thickened, 5-6 minutes.
- Transfer sauce to a wide bowl. Using tongs, dip baked chicken fingers into sauce, return to baking sheets, and bake for an additional 4-5 minutes, watching closely.
- Garnish with remaining 1/4 cup sliced almonds and chopped cilantro before serving.
Notes
- Refrigerating coated chicken before baking helps the breading stay intact.
- Adjust chili flakes for desired heat level.
- Can be made with regular flour and breadcrumbs if not gluten-free.
- Pairs well with steamed rice or a light salad.
Nutrition
- Serving Size: 1 serving
- Calories: 320
- Sugar: 10g
- Sodium: 520mg
- Fat: 12g
- Saturated Fat: 2g
- Unsaturated Fat: 8g
- Trans Fat: 0g
- Carbohydrates: 25g
- Fiber: 2g
- Protein: 28g
- Cholesterol: 90mg
Keywords: Thai-style chicken fingers, baked chicken fingers, gluten free chicken fingers, almond crusted chicken
Preparing the Sweet Chili Sauce for Thai-Style Chicken Fingers
The Flavor Profile of a Perfect Sweet Chili Sauce
The sauce is where Thai-Style Chicken Fingers step out of the ordinary and into the unforgettable. This sweet chili glaze delivers a balance of heat, tang, and sweetness that perfectly complements the crunchy coating. It’s not just a dip—it’s a flavor enhancer that clings to each bite, adding shine and stickiness that makes the dish irresistible. A well-made sauce should coat the back of a spoon, be glossy, and offer layers of taste that build as you eat.
Ingredients That Make the Sauce Stand Out
To achieve the signature flavor of Thai-Style Chicken Fingers, the sauce begins with a base of sweet chili sauce and water for consistency. Brown sugar deepens the sweetness while gluten-free tamari (or soy sauce) brings a salty umami note. Rice vinegar adds brightness, fresh lime juice brings zest, and ground ginger provides gentle warmth. Garlic infuses savory depth, while red chili flakes control the heat level—add more if you want a spicier kick. Each component plays a role in balancing sweet, salty, sour, and spicy notes, which is the essence of Thai cooking.
Cooking the Sauce to Perfection
Combine all sauce ingredients in a small saucepan over medium-high heat. Once it begins to simmer, reduce the heat and let it bubble gently for about 5–6 minutes. This reduction process thickens the sauce naturally, concentrating its flavors without the need for starches. Stir occasionally to prevent sticking or burning, especially as the sugar caramelizes. When done, it should be slightly thickened but still pourable, perfect for coating the Thai-Style Chicken Fingers evenly.
Why the Sauce Completes the Dish
Without the sauce, Thai-Style Chicken Fingers would still be tasty, but the experience wouldn’t be complete. The sweet chili glaze is what transforms them from a standard finger food into a vibrant, Thai-inspired centerpiece. It adds moisture to each bite, ties together the nutty crust and tender chicken, and leaves a lingering flavor that makes you want just one more piece. Whether served immediately or reheated later, the sauce ensures your Thai-Style Chicken Fingers remain bold, flavorful, and addictive.
Baking Thai-Style Chicken Fingers to Crispy Perfection
Why Baking Works So Well for Thai-Style Chicken Fingers
While many chicken finger recipes rely on deep frying, baking Thai-Style Chicken Fingers allows you to achieve a crispy exterior without the excess oil. This method makes the dish lighter while preserving the crunchy almond and breadcrumb coating. Baking also lets the flavors develop more evenly, as the heat circulates around each piece, creating a golden crust that stays intact when you bite into it.
Setting Up for Success
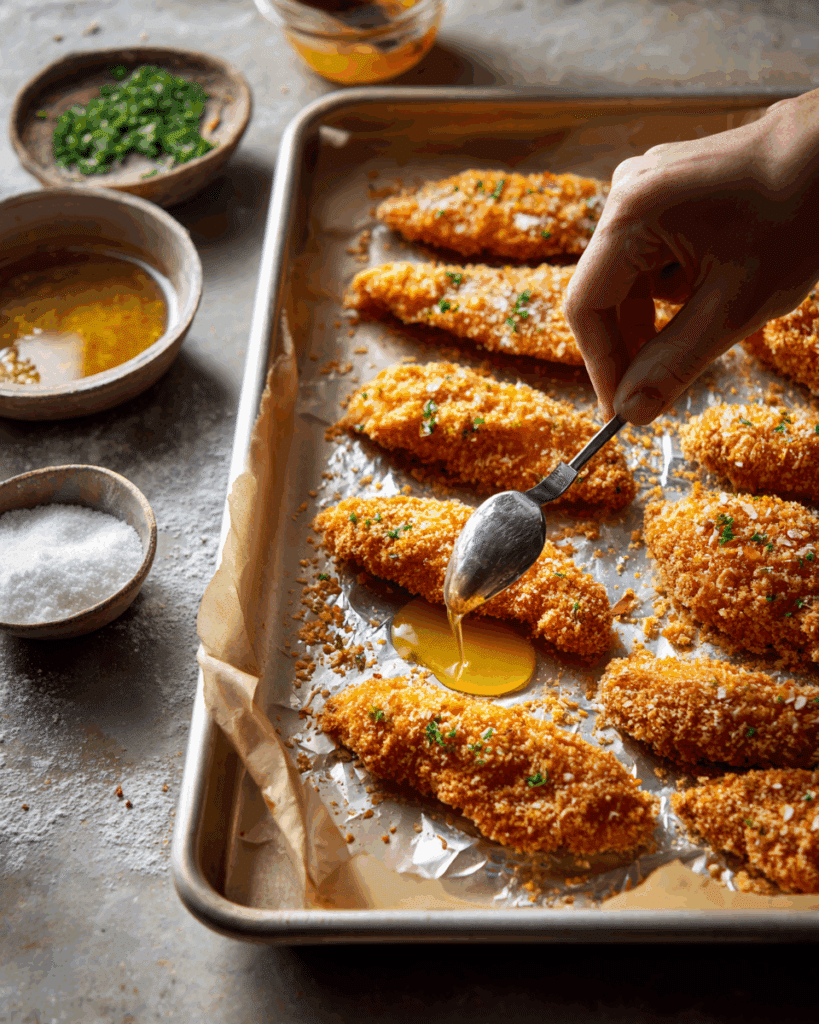
Before baking Thai-Style Chicken Fingers, line two half-sheet pans with parchment paper or foil. Spray the surface well with nonstick spray to prevent sticking. Preheating the oven to 425°F is key because starting with high heat helps set the crust quickly, locking in juices and creating that signature crunch. Place the prepared chicken strips on the sheet pans with space between each piece so they cook evenly and crisp up on all sides.
The Perfect Baking Process
Once your Thai-Style Chicken Fingers are arranged, spray the tops lightly with olive oil or nonstick spray. This encourages browning and ensures the crust doesn’t dry out. Bake for 10 minutes, then flip each piece, spraying the tops again. Return them to the oven, rotating the pans if necessary, and bake for an additional 7–9 minutes. At this point, the chicken should be cooked through, with no pink inside, and the coating should be a rich golden brown.
Adding the Sauce at the Right Time
One of the secrets to keeping Thai-Style Chicken Fingers crisp while still getting that sticky, flavorful coating is timing. Once the chicken is fully baked, dunk each strip into the prepared sweet chili sauce using tongs, ensuring full coverage. Then place them back on the sheet pans and return to the oven for an additional 4–5 minutes. This final bake helps the sauce set, turning it into a shiny glaze that clings perfectly without making the crust soggy.
Testing for Doneness
The best way to know your Thai-Style Chicken Fingers are ready is to check the internal temperature with a meat thermometer it should read 165°F at the thickest part of the chicken. If you don’t have a thermometer, cut into one piece to make sure the juices run clear and the meat is opaque all the way through. This step ensures food safety without overcooking, so your Thai-Style Chicken Fingers remain tender and juicy.
Serving and Garnishing Thai-Style Chicken Fingers
Creating a Visual Feast
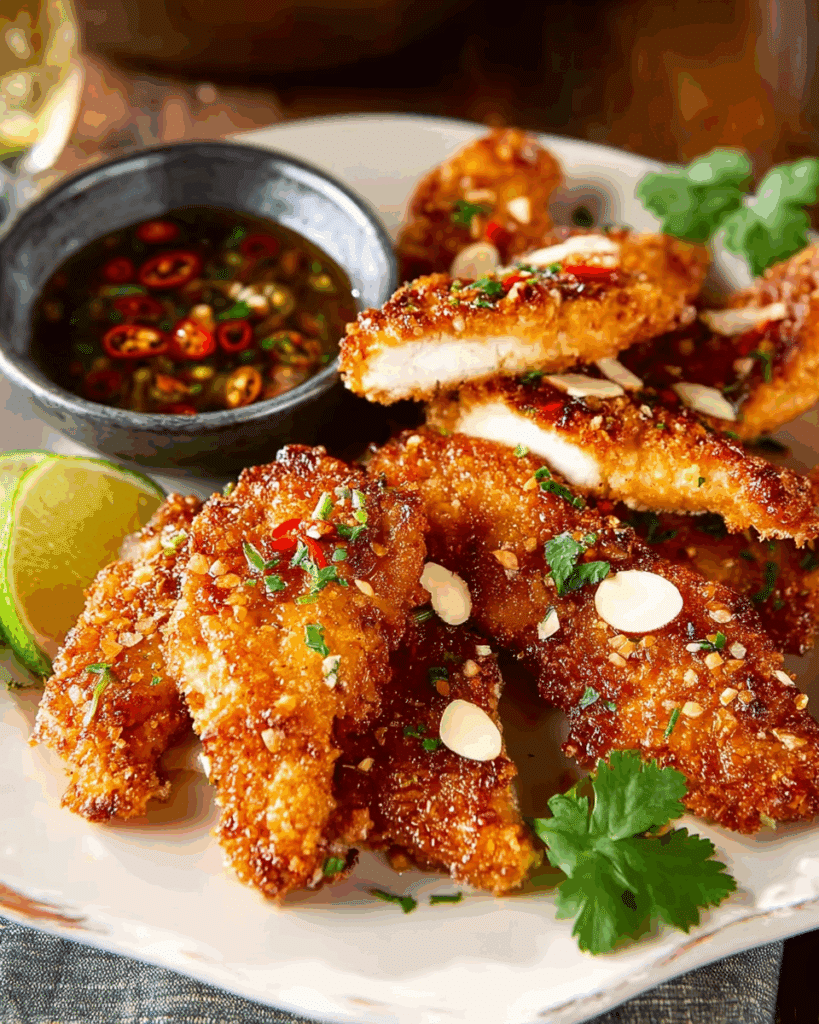
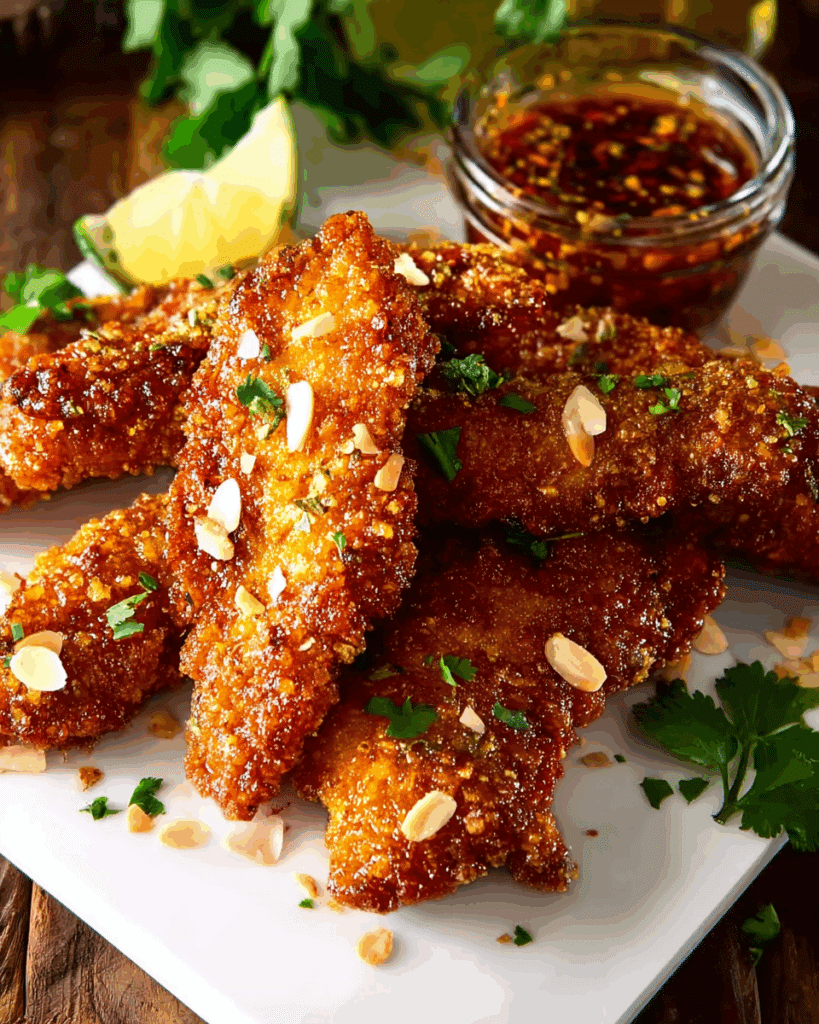
Presentation plays a big role in making Thai-Style Chicken Fingers as appealing to the eyes as they are to the taste buds. Arrange the golden-brown strips neatly on a platter, letting the shiny glaze reflect the light. The bright red hue of the sweet chili sauce pairs beautifully with the golden crust, giving your dish a restaurant-quality look. For added appeal, serve them in a slightly overlapping fan shape, which creates depth and makes the plate look full and inviting.
Adding Fresh Garnishes
The final touches can elevate Thai-Style Chicken Fingers from delicious to unforgettable. Sprinkle freshly chopped cilantro over the top for a burst of green color and a fresh, herbal note that cuts through the sweetness of the sauce. Scatter the remaining sliced almonds for extra crunch and visual texture. A few thin lime wedges on the side not only enhance presentation but also give diners the option to squeeze fresh citrus over their Thai-Style Chicken Fingers for added brightness.
Choosing the Right Serving Style
Thai-Style Chicken Fingers are versatile enough to serve in different ways depending on the occasion. For casual gatherings, place them on a large platter with small dipping bowls of extra sweet chili sauce. For a more formal dinner, serve them on individual plates with a side of jasmine rice or a fresh Thai salad. They also make a fantastic addition to a party buffet, where their bold flavors stand out among other appetizers.
Balancing Accompaniments
When serving Thai-Style Chicken Fingers, think about flavors and textures that complement them. A cool cucumber salad or a crisp Thai slaw brings freshness and crunch, balancing the richness of the glaze. Steamed vegetables, coconut rice, or even Thai fried rice can turn this appetizer into a full meal. Offering a mild dipping sauce, such as a coconut-lime yogurt blend, gives an option for those who prefer less spice while still enjoying the full flavor profile of Thai-Style Chicken Fingers.
Variations and Creative Twists for Thai-Style Chicken Fingers
Making Thai-Style Chicken Fingers Gluten-Free
One of the best things about Thai-Style Chicken Fingers is how easily they can be adapted to suit dietary needs. For a gluten-free version, simply use gluten-free flour for dredging and substitute crushed Rice Chex or gluten-free breadcrumbs for the coating. Pair that with gluten-free tamari in the sauce, and you have a crispy, flavorful dish that everyone at the table can enjoy without compromise. The texture and taste remain just as satisfying as the traditional version.
Turning Up the Heat
If you’re a spice lover, Thai-Style Chicken Fingers can be made extra fiery by adding more red chili flakes or even finely chopped fresh Thai chilies to the sauce. You can also season the coating with a pinch of cayenne pepper for heat in every bite. This approach turns the dish into a bold appetizer that’s perfect for anyone who enjoys a little burn with their crunch.
Adding a Tropical Twist
For a playful variation, you can add finely shredded coconut to the almond and breadcrumb mix. This gives Thai-Style Chicken Fingers a slightly sweet, tropical edge that pairs beautifully with the tangy chili glaze. It’s an especially great option for summer gatherings or when you want to highlight more island-inspired flavors in your Thai dishes.
Making Them Kid-Friendly
To make Thai-Style Chicken Fingers more appealing to kids, reduce the amount of chili flakes in the sauce or swap the spicy sweet chili sauce for a milder honey-garlic glaze. Kids still get the same crispy coating and juicy chicken, but with a sauce that’s sweet, sticky, and totally approachable for younger palates. Serve alongside carrot sticks or cucumber slices for a balanced plate.
Mini Thai-Style Chicken Fingers for Parties
If you’re hosting a large gathering, consider cutting the chicken strips smaller before coating and baking. Mini Thai-Style Chicken Fingers are bite-sized, easy to eat with toothpicks, and make for an irresistible party snack. They’re just as flavorful, and their smaller size means they’re quicker to bake, making them perfect for entertaining without spending all night in the kitchen.
Storing and Reheating Thai-Style Chicken Fingers
Proper Storage for Freshness
When you’ve made a batch of Thai-Style Chicken Fingers and have leftovers, storing them correctly ensures they stay flavorful and safe to eat. Allow the chicken fingers to cool completely before placing them in an airtight container. If you store them while still warm, condensation will build up, making the coating soggy. For best results, separate layers with parchment paper so the Thai-Style Chicken Fingers don’t stick together. In the refrigerator, they’ll stay fresh for up to 3–4 days.
Freezing for Long-Term Use
If you want to keep Thai-Style Chicken Fingers for longer, freezing is a great option. Arrange the cooled chicken fingers in a single layer on a baking sheet and freeze until solid, about 2 hours. Then transfer them to a freezer-safe bag or container, removing as much air as possible to prevent freezer burn. Frozen Thai-Style Chicken Fingers can be stored for up to 2 months without losing much of their texture or flavor.
Reheating for Maximum Crispiness
To bring refrigerated Thai-Style Chicken Fingers back to life, preheat your oven to 375°F. Arrange them on a wire rack set over a baking sheet and bake for 8–10 minutes, or until heated through and crispy again. Avoid microwaving, as it tends to make the coating soft and chewy rather than crisp. For frozen chicken fingers, bake at 375°F for 18–20 minutes, flipping halfway through, until hot and crunchy.
Maintaining Flavor and Texture
When reheating, the goal is to restore the crunch without drying out the chicken. Spraying the Thai-Style Chicken Fingers lightly with oil before baking can help revive their golden color and enhance crispiness. If you stored extra sweet chili sauce separately, you can warm it gently and brush it over the chicken just before serving for a fresh, glossy finish.
Serving Leftovers Creatively
Leftover Thai-Style Chicken Fingers don’t just have to be reheated and eaten as-is. You can slice them and add them to salads, wraps, or rice bowls. They’re also fantastic chopped into smaller pieces and used as a topping for Thai-style noodle dishes. This way, you get to enjoy their unique flavor in new and exciting ways without feeling like you’re eating the same meal twice.
Pairing with Side Dishes and Drinks
Fresh and Crisp Side Options
The bold flavors of this chicken dish shine even brighter when paired with sides that offer contrast in texture and taste. A classic Thai papaya salad brings freshness, crunch, and a sweet-tangy punch that balances the savory coating and sweet chili glaze. A cucumber and mint salad with a light rice vinegar dressing is another refreshing option, cooling the palate between bites.
Rice and Noodle Companions
No Thai-inspired meal feels complete without a comforting rice or noodle side. Jasmine rice is a natural choice, soaking up the sauce while adding a subtle floral aroma. For a more robust pairing, consider coconut rice for a creamy, slightly sweet counterpoint. Stir-fried noodles with vegetables and a light soy-lime dressing also complement the flavors beautifully without overpowering them.
Vegetable-Based Complements
Lightly stir-fried vegetables—like bok choy, snow peas, and carrots—add color, nutrition, and a gentle crunch that works well alongside crispy chicken. Steamed broccoli with a squeeze of lime juice or grilled corn with a dusting of chili powder also make for delightful, simple sides.
Drink Pairings for a Balanced Experience
To round out the meal, think about drinks that complement the sweet, savory, and spicy notes. Thai iced tea is a perfect choice, offering creamy sweetness to offset any heat in the dish. A sparkling lime soda or ginger-infused iced tea provides a zesty lift that cleanses the palate. For adult gatherings, a light beer or crisp white wine like Sauvignon Blanc pairs beautifully, balancing richness with refreshing acidity.
Creating a Cohesive Table Spread
When building your meal, aim for a variety of colors, flavors, and textures on the table. Mixing fresh salads, warm rice or noodles, and flavorful drinks creates a balanced dining experience that feels complete and satisfying. Even simple accompaniments, when thoughtfully chosen, can elevate the entire presentation and turn a casual dinner into a memorable event.
Conclusion
This recipe is a perfect example of how thoughtful preparation and balanced flavors can turn a simple chicken dish into something truly memorable. With its crunchy coating, vibrant sauce, and adaptable nature, it’s suitable for casual family dinners, parties, or even as part of a larger Thai-inspired feast. The process of creating it—from selecting quality chicken to adding the final garnish—highlights the joy of cooking food that’s both comforting and exciting. By experimenting with variations, storing leftovers properly, and pairing with complementary sides, you can enjoy this dish in multiple ways and make it a regular favorite in your kitchen.
FAQs
Is it possible to adjust the sauce’s spice level?
Absolutely. For a milder version, reduce or omit the red chili flakes. If you like more heat, increase the amount or add fresh chopped Thai chilies. You can also experiment with different chili sauces to suit your taste preferences.
What can I substitute for almonds in the coating?
If you have a nut allergy or prefer a different texture, you can replace almonds with crushed pretzels, unsweetened shredded coconut, or sesame seeds. Each option adds its own unique flavor profile while maintaining a satisfying crunch.
How can I make the coating even crispier?
Using a combination of panko breadcrumbs and crushed almonds gives an extra crunch. Also, placing the chicken on a wire rack during baking allows hot air to circulate around each piece, ensuring even crisping without sogginess.
Can I make this recipe ahead of time?
Yes, you can prepare the coated chicken strips and store them in the refrigerator for up to 24 hours before baking. This allows the breading to adhere fully, which actually improves the crispness when cooked. Just wait to make the sauce until you’re ready to finish the dish.