White Chocolate Thai Tea Mochi
There’s something incredibly comforting about biting into soft, chewy mochi and discovering a creamy center hidden inside. These White Chocolate Thai Tea Mochi are one of those treats that instantly feel special from the very first bite. The sweet aroma of Thai tea blends beautifully with the mellow richness of white chocolate, creating a dessert that feels cozy, elegant, and just a little playful at the same time. Trust me, you’re going to love this.
The chewy texture is what makes these little bites unforgettable. The outside stays soft and slightly stretchy, while the inside melts smoothly with every bite. And now that you’re already imagining that creamy filling, let’s dive into what makes this dessert such a favorite for home bakers and sweet lovers alike.
Why These Chewy Little Treats Are Worth Every Bite
If you’ve never made mochi at home before, this recipe is a total game-changer. It looks impressive, tastes bakery-worthy, and comes together with surprisingly simple ingredients. The balance of flavors is what really makes it shine. Thai tea brings warm caramel-like notes and a subtle spice, while white chocolate softens everything into a creamy dreamy dessert.
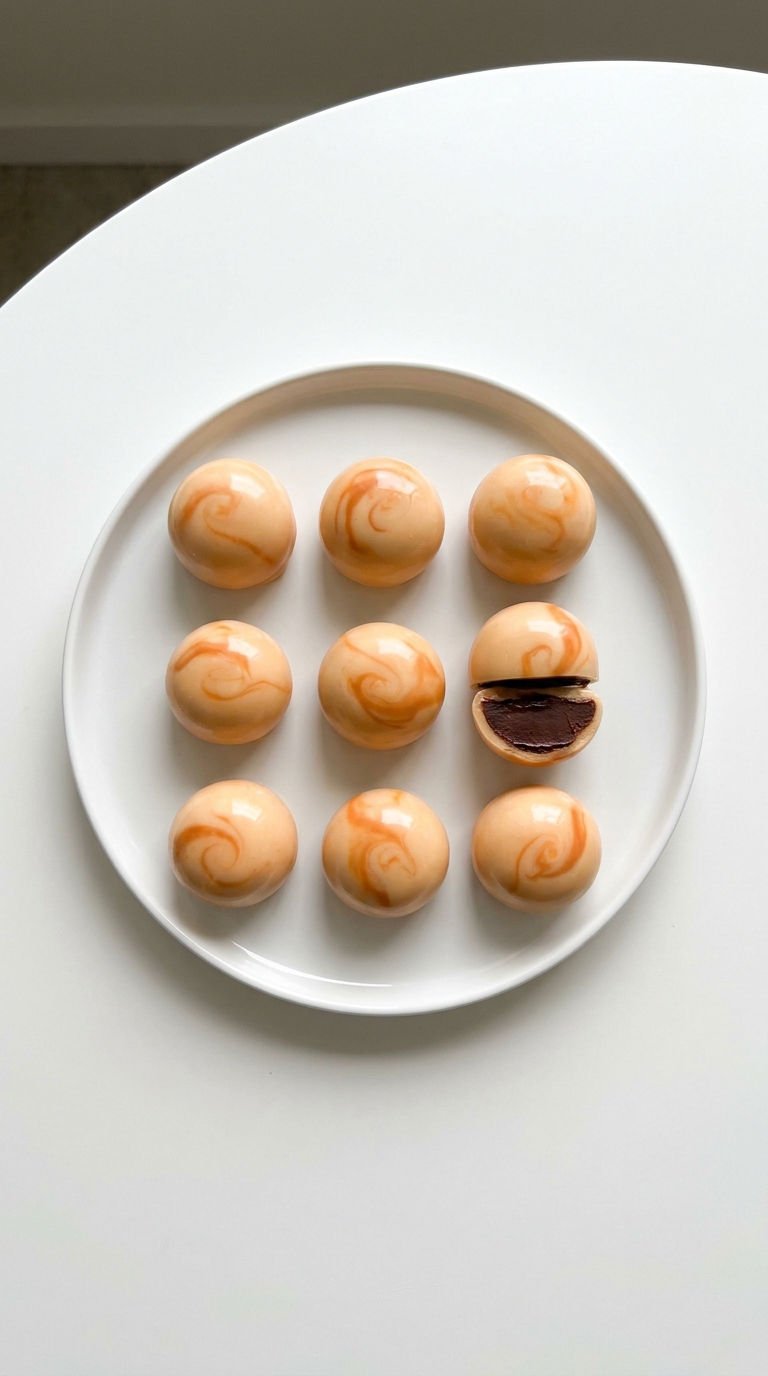
These mochi are perfect for parties, cozy evenings, afternoon coffee breaks, or even as homemade gifts. They look beautiful on a dessert tray, especially with their glossy coating and soft golden tea color peeking through. Let me tell you, it’s worth every bite.
And while the flavor is modern and fun, the roots of mochi itself have a rich story behind them.
A Sweet Fusion Inspired by Tradition
Mochi has long been loved across many Asian cultures, especially in Japan where the chewy rice dessert became a symbol of celebration and comfort. Traditional mochi often features sweet bean fillings, but over time bakers around the world started experimenting with exciting new flavors and textures.
Thai tea, on the other hand, is famous for its bold orange color and creamy spiced flavor. Combining Thai tea with mochi creates a beautiful fusion dessert that feels both nostalgic and fresh. White chocolate adds a smooth modern twist that ties everything together perfectly.
And now that you know the inspiration behind these little treats, let’s talk about why this recipe works so beautifully every single time.
What Makes This Recipe So Reliable and Fun
This dessert might look fancy, but it’s actually very approachable once you get started. Every step is simple and rewarding.
Versatile: These mochi work beautifully as a dessert, snack, party treat, or even a homemade edible gift.
Budget-Friendly: Most ingredients are easy to find and affordable, especially compared to specialty bakery desserts.
Quick and Easy: The cooking process is surprisingly simple, and most of the time goes into chilling and shaping.
Customizable: You can switch fillings, adjust sweetness, or experiment with coatings for your own twist.
Crowd-Pleasing: The chewy texture and creamy center make these impossible to resist at gatherings.
Make-Ahead Friendly: These store well in the fridge, making them perfect for preparing ahead of time.
Great for Leftovers: Extra mochi stay delicious chilled, and the texture remains pleasantly chewy.
And before we start mixing and shaping, here are a few insider tricks that make homemade mochi even better.
Expert Secrets for Perfect Mochi Every Time
Making mochi becomes much easier once you understand a few simple tricks.
- Use glutinous rice flour only, because regular rice flour will not create the signature chewy texture.
- Let the mochi dough cool slightly before handling it so it becomes easier to shape.
- Dust your hands lightly with cornstarch to prevent sticking while wrapping the filling.
- Chill the white chocolate filling before assembling so it stays firm and easy to seal inside the dough.
- Avoid overcooking the dough, because it can become too firm instead of soft and stretchy.
And now let’s get your kitchen ready with the simple tools you’ll need.
Essential Kitchen Tools for Smooth Mochi Making
A few basic kitchen tools make the process much more enjoyable and stress-free.
Mixing Bowl: Needed for combining the mochi dough ingredients evenly.
Microwave-Safe Bowl: Helps cook the dough quickly and evenly.
Silicone Spatula: Perfect for stirring the sticky dough smoothly.
Small Cookie Scoop: Makes portioning the filling much easier.
Plastic Wrap: Useful for chilling and storing the finished mochi.
Fine Mesh Sieve: Helps dust cornstarch evenly to prevent sticking.
And now comes the delicious part, gathering the ingredients that bring all those flavors together.
Everything You Need for These Creamy Mochi Bites
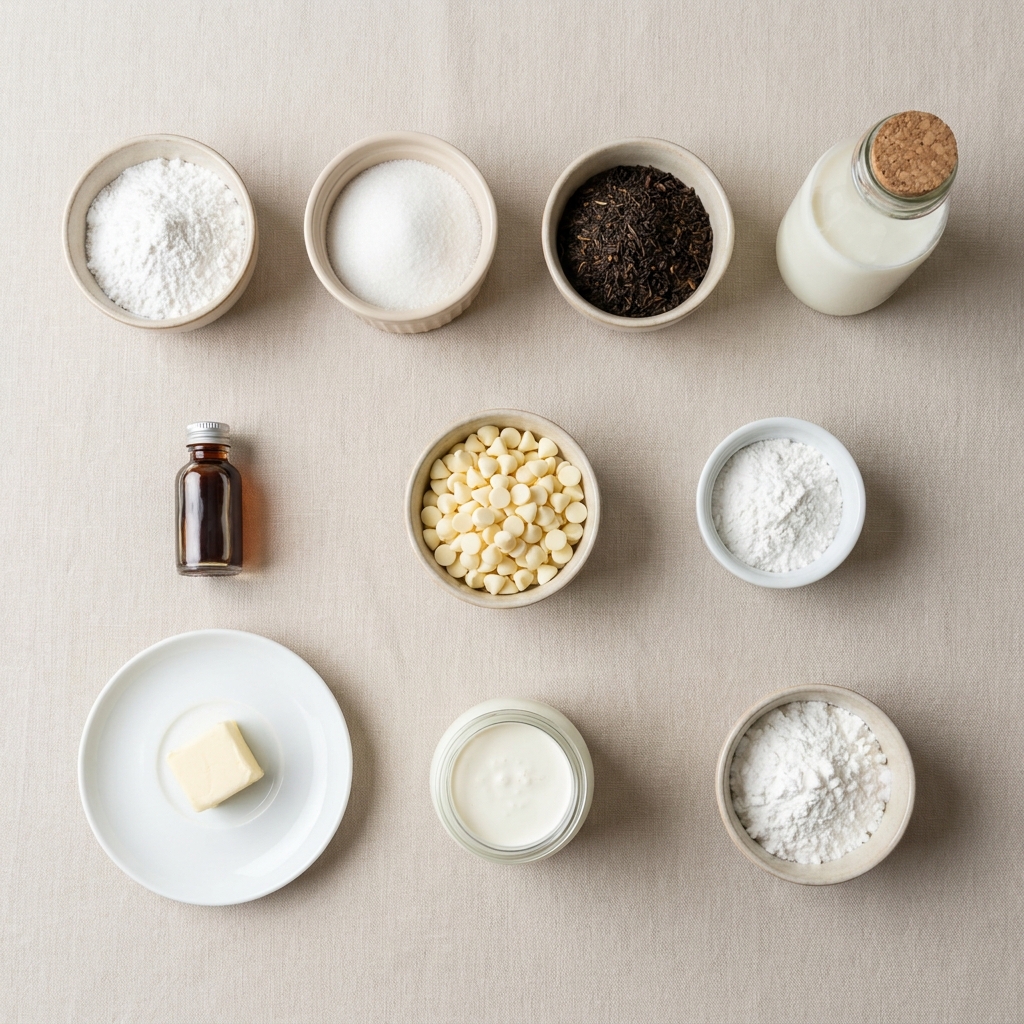
The beauty of this recipe is how a handful of ingredients can create something so unique and satisfying.
- Glutinous Rice Flour: 1 cup, creates the signature chewy mochi texture.
- Thai Tea Leaves: 2 tablespoons, infuses the dessert with warm spiced tea flavor.
- Whole Milk: 3/4 cup, adds richness and softness to the dough.
- Granulated Sugar: 1/4 cup, sweetens the dough gently without overpowering the tea flavor.
- White Chocolate Chips: 3/4 cup, creates the creamy filling and coating flavor.
- Unsalted Butter: 1 tablespoon, helps create a smooth soft texture.
- Cornstarch: 1/2 cup, prevents sticking during shaping.
- Heavy Cream: 2 tablespoons, softens the melted white chocolate filling.
- Vanilla Extract: 1 teaspoon, enhances the sweet creamy aroma.
Now that the ingredients are lined up and ready, let’s look at a few easy swaps in case you want to customize things.
Easy Ingredient Swaps You Can Try
These substitutions help make the recipe flexible without losing its charm.
Whole Milk: Coconut milk for a richer flavor.
White Chocolate Chips: Dark chocolate for a deeper contrast.
Granulated Sugar: Honey or maple syrup for a softer sweetness.
Vanilla Extract: Almond extract for a slightly nutty aroma.
Heavy Cream: Evaporated milk for a lighter filling.
And while every ingredient matters, there are two stars here that truly define the dessert.
The Two Ingredients That Make This Dessert Shine
Thai Tea Leaves: These give the mochi its signature warm tea flavor with hints of vanilla and spice that make every bite cozy and aromatic.
Glutinous Rice Flour: This special flour creates the stretchy chewy texture that makes mochi so satisfying and unique.
And now comes the fun part, bringing everything together step by step.
Let’s Make These Soft and Chewy Mochi Together
The process is relaxing, rewarding, and honestly pretty fun once you get started.
- Preheat Your Equipment: Prepare a clean work surface and lightly dust it with cornstarch. Chill the white chocolate filling ingredients in advance.
- Combine Ingredients: Steep the Thai tea leaves in warm milk for 10 minutes, then strain. Mix the infused milk with glutinous rice flour, sugar, butter, and vanilla until smooth.
- Prepare Your Cooking Vessel: Transfer the mixture into a microwave-safe bowl and cover loosely.
- Assemble the Dish: Microwave in short intervals, stirring between each round until the dough becomes thick and stretchy. Melt the white chocolate with heavy cream separately and chill until scoopable.
- Cook to Perfection: Let the mochi dough cool slightly, then divide into portions. Flatten each piece, add white chocolate filling, and seal carefully into smooth balls.
- Finishing Touches: Dust lightly with cornstarch and chill for 15 minutes so the texture firms up beautifully.
- Serve and Enjoy: Serve slightly chilled for the perfect balance of chewy exterior and creamy filling.
And once they’re finished, the texture and flavor become absolutely irresistible.
The Irresistible Texture and Flavor Combination
The first thing you notice is the soft chewy bite of the mochi shell. It stretches gently before giving way to the silky white chocolate center. Then the Thai tea flavor starts to bloom, warm, creamy, and slightly caramel-like.
The contrast between the cool filling and the tender dough makes every bite feel layered and satisfying. This one’s a total game-changer if you love desserts with unique textures.
And before you start making your batch, here are a few extra tricks that help guarantee success.
Helpful Tricks for Better Mochi
These simple tips make the process smoother and the results even tastier.
- Dust Generously: Use enough cornstarch while shaping so the dough stays manageable.
- Chill the Filling: Cold filling is much easier to wrap neatly inside the dough.
- Work Quickly: Mochi becomes stickier as it cools, so shaping while slightly warm works best.
- Use Fresh Tea: Fresh Thai tea leaves create the most vibrant flavor and aroma.
Even simple recipes have a few common mistakes, so let’s avoid them before they happen.
Mistakes to Avoid for the Best Texture
Making mochi is easier once you know what to watch for.
- Skipping Cornstarch: Without enough dusting, the dough becomes difficult to handle.
- Overheating the Dough: Too much cooking can make the mochi tough instead of chewy.
- Adding Warm Filling: Warm filling can melt through the dough and make sealing difficult.
- Using Regular Rice Flour: This changes the texture completely and removes the signature chewiness.
And now let’s quickly break down the nutrition details.
Nutrition Snapshot
Servings: 10 mochi
Calories per serving: 210
Note: These are approximate values.
And before you plan your baking session, here’s the timing you’ll need.
Time Needed for This Recipe
Prep Time: 25 minutes
Cook Time: 10 minutes
Total Time: 35 minutes
One of the best things about mochi is how well it stores, which makes it perfect for preparing ahead.
Smart Make-Ahead and Storage Tips
These mochi can easily be prepared a day in advance and stored chilled until serving time. Keep them in an airtight container with parchment paper between layers so they don’t stick together.
For longer storage, freeze the mochi individually wrapped and thaw them in the refrigerator before serving. Reheating is not necessary, because the texture stays soft and chewy when chilled properly.
And now that your mochi are ready, let’s talk about the best ways to serve them.
Fun and Cozy Ways to Serve These Mochi
Serve these mochi with iced Thai tea, hot coffee, or even a creamy milk tea latte for a cozy dessert pairing. They also look beautiful arranged on a simple dessert board with fresh berries or sliced fruit.
For parties, place them in decorative paper liners so guests can easily grab one without sticking.
And if you somehow end up with leftovers, there are still fun ways to enjoy them.
Creative Ideas for Leftover Mochi
Slice leftover mochi into smaller pieces and add them to dessert bowls or ice cream sundaes. You can also freeze them slightly and enjoy them as a chilled chewy snack on warm days.
Another fun idea is chopping them into bite-sized cubes and folding them into milk tea parfaits.
And before you head to the kitchen, here are a few final tips to make the process even easier.
Extra Tips for the Best Homemade Mochi
Keep your hands lightly dusted with cornstarch throughout the shaping process. If the dough becomes too sticky, chill it briefly before continuing.
For extra flavor depth, you can sprinkle a little Thai tea powder over the finished mochi before serving.
And if you really want these to stand out visually, presentation makes all the difference.
Simple Ways to Make These Mochi Look Stunning
Arrange the mochi on a clean white plate with soft lighting to highlight their glossy finish. A small dusting of powdered sugar or Thai tea powder adds beautiful contrast without overwhelming the look.
Cut one mochi open before serving so the creamy filling becomes visible. Trust me, everyone will reach for that one first.
And now that you’ve mastered the classic version, here are a few fun twists worth trying.
Delicious Variations Worth Exploring
- Matcha Twist: Replace Thai tea with matcha powder for a grassy earthy flavor.
- Cookies and Cream Version: Add crushed chocolate sandwich cookies into the filling.
- Strawberry Mochi: Use strawberry white chocolate for a fruity creamy variation.
- Coconut Style: Swap milk for coconut milk and roll the mochi lightly in shredded coconut.
- Dark Chocolate Center: Use dark chocolate ganache for a richer less sweet filling.
FAQ’s
Q1: Can I make mochi without a microwave?
Yes, you can steam the dough on the stovetop until thick and stretchy.
Q2: Why is my mochi too sticky?
It usually needs more cornstarch during shaping or slightly longer cooling time.
Q3: Can I use regular tea instead of Thai tea?
Yes, but the flavor will be different and less creamy.
Q4: How long does mochi stay fresh?
It tastes best within 2 days when stored chilled.
Q5: Can I freeze these mochi?
Absolutely. Wrap them individually before freezing.
Q6: Is mochi gluten free?
Yes, glutinous rice flour is naturally gluten free despite the name.
Q7: Can I use dairy-free chocolate?
Yes, dairy-free white chocolate alternatives work well.
Q8: Why did my filling leak out?
The filling was likely too warm during assembly.
Q9: Can kids help make this recipe?
Definitely. Shaping the mochi is especially fun for kids.
Q10: What does Thai tea taste like in desserts?
It tastes creamy, slightly spiced, caramel-like, and very comforting.
Conclusion
These White Chocolate Thai Tea Mochi are soft, creamy, chewy, and completely unforgettable. They bring together comforting Thai tea flavor and rich white chocolate in a dessert that feels playful yet elegant at the same time. Whether you’re making them for friends, family, or just yourself, they always feel special from the very first bite. Let me tell you, once you try homemade mochi like this, you’ll want to make them again and again.
Print
White Chocolate Thai Tea Mochi
- Prep Time: 25 minutes
- Cook Time: 10 minutes
- Total Time: 35 minutes
- Yield: 10 mochi 1x
- Category: Dessert
- Method: Microwave
- Cuisine: Asian Fusion
- Diet: Vegetarian
Description
Soft and chewy White Chocolate Thai Tea Mochi filled with creamy white chocolate and infused with warm Thai tea flavor for a cozy homemade dessert.
Ingredients
- 1 cup glutinous rice flour
- 2 tablespoons Thai tea leaves
- 3/4 cup whole milk
- 1/4 cup granulated sugar
- 3/4 cup white chocolate chips
- 1 tablespoon unsalted butter
- 1/2 cup cornstarch
- 2 tablespoons heavy cream
- 1 teaspoon vanilla extract
Instructions
- Steep Thai tea leaves in warm milk for 10 minutes, then strain.
- Mix the infused milk with glutinous rice flour, sugar, butter, and vanilla extract until smooth.
- Transfer the mixture to a microwave-safe bowl and microwave in short intervals, stirring between each round until thick and stretchy.
- Melt white chocolate chips with heavy cream and chill until scoopable.
- Allow the mochi dough to cool slightly and divide into portions.
- Flatten each piece of dough, add white chocolate filling, and seal into smooth balls.
- Dust lightly with cornstarch and chill for 15 minutes before serving.
Notes
- Use glutinous rice flour only for the correct chewy texture.
- Chill the filling before assembling for easier shaping.
- Dust hands and surfaces generously with cornstarch.
- Store leftovers in an airtight container in the refrigerator.
Nutrition
- Serving Size: 1 mochi
- Calories: 210
- Sugar: 16g
- Sodium: 35mg
- Fat: 8g
- Saturated Fat: 5g
- Unsaturated Fat: 2g
- Trans Fat: 0g
- Carbohydrates: 31g
- Fiber: 1g
- Protein: 3g
- Cholesterol: 15mg
Keywords: white chocolate mochi, thai tea dessert, chewy mochi recipe, homemade mochi, white chocolate thai tea mochi